FDM vs Resin 3D Printing: Which Is Right for Your Project?
Compare FDM and resin 3D printing for detail, materials, size, supports and finishing. Learn which process may suit your project.
MAKE
10/2/20264 min read


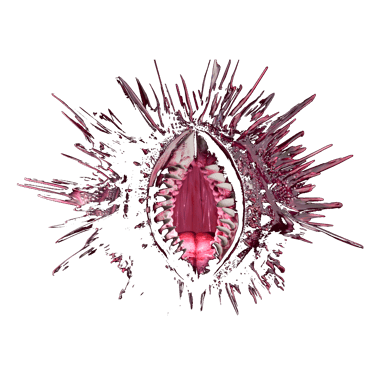
Reconstructing the Oyster. Different material versions of the same scanned form. Project photography courtesy of the client. View the material study →
A detailed sculpture, a working prototype and an exhibition component can all begin as 3D models. That does not mean they should be manufactured in the same way.
FDM and resin printing offer different combinations of material, surface quality and production requirements. Choosing between them starts with the object: what it needs to do, which details matter and how it will be handled or presented. A smoother print is not automatically a more suitable one.
Three decisions to make first
Use: will the object be displayed, handled or put into service?
Surface: which faces and details will be seen most closely?
Scope: do you need a raw print, assembled parts or a finished presentation object?
Start with the intended outcome
Before choosing a process, describe the result you need. Is the object a visual model, a part that must fit another component, or a finished artwork? Will it be viewed closely, photographed, repeatedly handled or installed beyond easy reach?
These questions help separate essential requirements from preferences. A subtle surface texture might be acceptable on a scale study but distracting on a close-up presentation model. A slender feature might look right in a render yet need development before it can survive handling.
You do not need to choose technical settings before asking for help. The intended use and the surfaces that matter are more useful starting points.
What is the difference between FDM and resin printing?
FDM, or fused deposition modelling, builds an object by depositing heated thermoplastic filament through a nozzle. Resin printing forms layers by selectively curing a liquid photopolymer with light. Resin systems use different exposure methods, including laser-based SLA, DLP and masked LCD processes; not every resin printer works identically.
This is a difference in how the object is made, not a simple ranking of good and better. Both routes still need a model suited to the process and a material chosen for the application.
Detail and surface quality
Resin printing is often useful for small details and surfaces where visible stepping would be distracting. FDM typically leaves more apparent extrusion texture. Neither process guarantees an invisible layer structure or a finished presentation surface without further work.
Layer height also matters. Smaller layers can reduce the staircase effect on sloping surfaces, but they do not automatically improve every feature. On FDM parts, nozzle size and extrusion width affect the detail that can be formed across each layer, while layer height describes the vertical increment. Geometry and orientation remain part of the decision.
For a project brief, identify the areas that will be seen most closely. A photograph with the important face marked can be more useful than asking for the highest possible resolution everywhere.
Material choice matters as much as the process
Avoid assuming that every resin is fragile or every filament produces a strong functional part. The relevant properties belong to a particular material, used under particular processing conditions. Strength, flexibility and heat resistance are separate requirements, not interchangeable meanings of “durable”.
If an object will carry a load, bend repeatedly or encounter heat, describe that use explicitly. A visual prototype and a part intended for repeated service may need different materials and validation. Appearance alone cannot establish suitability.
Colour and finish also belong in the brief. A metallic-looking surface, for example, is an appearance requirement; it does not mean the object is made from metal. Explain whether the chosen colour needs to come from the printing material or can be achieved through a separately specified finish.
Size, supports and the surfaces you will see
Ask whether the proposed object can be produced as one piece or would benefit from being divided into components. If joints are needed, their position and appearance should be considered before production, particularly on a sculpture or exhibition object with an uninterrupted silhouette.
Supports are another design consideration. Where they meet a resin print, removing them can leave marks. Orientation can help keep contact points away from important surfaces, although it may introduce other compromises. Manufacturer design guidance is specific to the tested printer, material and settings, so a minimum wall thickness from one guide should not be treated as universal.
A practical example: Reconstructing the Oyster
In LILIS LAB's Reconstructing the Oyster project, one scanned form was produced using SLA and FDM processes across flexible resin, model resin and a wood-filled filament. The purpose was to explore how the same geometry could produce different material and visual outcomes.
For the flexible resin version, the studio developed the orientation and support strategy around the surface that mattered most to the client, concentrating supports on the reverse. This was a project-specific decision about material behaviour and presentation, not proof that one process is always preferable.
Compare the complete outcome, not just the print
Resin parts require cleaning and, where specified for the material, post-curing. FDM avoids that resin-cleaning workflow, but support removal and surface finishing can still take work.
When comparing options, ask for the same final condition. A raw print and a sanded, painted presentation object are different deliverables. State whether visible layers, support marks or assembly seams are acceptable, and check which finishing steps are included in the quotation.
The useful comparison is therefore not “Which technology is best?” but “Which route meets this brief with the appropriate material, finish and production scope?”
What to send when you are unsure
Send your model if you have one, together with the intended dimensions, quantity, use and deadline. Add a reference for the desired finish and identify any critical details or fitting surfaces. If there is no model yet, send references and explain what you want to create.
LILIS LAB offers design support, printing and finishing as individual services or connected stages. We can review the brief with you without assuming that every project needs the whole process.
NOT SURE WHICH PROCESS TO USE?
Tell us what the object needs to do and how you want it to look.
EXPLORE 3D PRINTING
START A PROJECT

Lunae Group Ltd trading name: Lilis Lab
Studio by appointment only
Monday to Friday
09:00 am – 6:00 pm
Stratford, London E15 2SP
Upload files & order online 24/7
Address:
our service
3D design & development
on-demand 3D printing
post production & finishing
photography & visual production
artist platform
Contact Us
Email: info@lilislab.co.uk
Whatsapp/Phone:+44 7462 549660
WeChat: lilislab
© 2026 Lunae Group Ltd // Registration: 16961587